Reading and Writing:
Creating a basic sequence when editing a video isn’t so hard when you understand how most people’s brains work. For almost all of us, we will start to get bored and our eyes will wander after a few seconds of looking at the same scene. Instead of showing a singular wide clip for more than a few seconds, a specifically tailored sequence of a few clips put together, can help tell the same story, but better.
The first part of creating a good sequence, according to the Bare Bones Camera Course book, is knowing the variety of shots to shoot and how it brings diverse footage to your piece. An establishing, wide shot for example, is a wide view of the subject and its surroundings. It gives us context and some more information of where we are. A close-up shot is also what it sounds like – it’s the closest you get to your subject. Showing detail and importance. Then of course the medium shot is what is in-between these two shots. A cutaway is another important shot that can be used in between other footage. It should relate to the subject but doesn’t have to match visually. Allowing you to change length and order of your overall sequence.
When shooting a sequence, it’s important to remember to change up the camera angle and image size. This means when shooting all your different shots mentioned above, your camera should be angled and images should all be unique. Once you get use to doing this, you will see that it can hide minor mistakes.
Getting smooth transitions from one clip to another can also be done when cutting on action. So be sure to shoot movement in one shot and have it finish in the next. Our eye will put together the rest. Having each shot have a clean entrance and exit will also help you when you edit. This ensures that you don’t have to match up anything to size or position.
Your sequence must also follow the rule called crossing the line. Its an imaginary line which determines the direction people and things face. You want to avoid crossing the line because when you do, viewers will see the reverse of what you previous showed, confusing them and leading them to believe that the subject moved. As long as the camera stays on one side of the line, your able to move 180 degrees, all with keeping everything at the same angle.
There are ways to successfully cross the line but it should only be done by professionals. If you must, you can do it by putting a neutral shot in between the two conflicting shots. This neutral shot is usually a POV. You can also have a point of reference in the shot. Like a wide shot of the stairs and then a closer one where the line was crossed. Cutting on action can also help if you cross the line in your sequence. While these ways aren’t perfect solutions, they can help you create a better video with what you have.
Research to Inform:
Showing continuity in movies are usually not noticeable when done well. However now that I’m learning more about how this technique, I find myself observing it in my everyday shows and movies.
One movie scene that uses continuity through multiple angles is the intro in the Social Network. The first scene is a conversation between two people who are sitting at a crowded bar. The first few seconds give us the wide shot where we establish the location and where the main characters are. Then as they continue their conversation, we get an angle over his shoulder, as well as an angle over her shoulder. This conversation goes back and forth for a few minutes where the angles change, depending on who is speaking. Then around the 5:16 mark, we see another angle, when she gets up to leave, which is a medium shot. We see her walk out of frame, showing him sitting alone. This scene was made possible only because multiple takes were done and cameras were placed within 180 degrees of each other. From the multiple takes, they were able to cut to different angles instead of showing 5 minutes of a conversation from a single perspective.
The movie Fargo is another good example showing continuity. The “finder’s fee scene” starts with showing us a wide shot of all three characters and shows us the room they are in. As they get to talking, the camera angles change. We get three different angles that hone in on each character. The camera on the main character (William H. Macy) is especially close up, so we know that this scene was also shot multiple times. What makes this scene especially great is that it uses multiple camera angles as well as different types of shots. Not only do we get a wide shot, and a close up shot, but we also get extreme close ups, medium shots, and an over the shoulder shot as well. Showing us that this one scene was probably shot dozens of times. Each with the intention of this conversation being spliced together to show perspective. It’s only when I study films like this, that I realized a few minutes of screen time probably took them all day to shoot.
This scene from National Treasure also uses continuity angles well. The entire three-minute clip shows multiple angles and cuts on action, letting us know that this was done in multiple takes. As they walk down the hallway, they try to find their way and change direction, which means the camera angles also change. Just this part gives us a view from behind them and then also in front. Once they reach a door, the camera goes from showing us a back view as they walk through the door, and then immediately cuts to a front view, where they walk through it. Not only do we get multiple angles, but we get a sense of urgency that is going on in the scene. The cut on action helps us feel this. After the one-minute mark, the movie continues to explore different angles. When they are looking under the table, we see a high camera angle and a side shot. That means that this part was also filmed more than once, or we would see the camera hanging over the table in the side shot. Great editing here helps us understand a fast-paced story and keeps us engaged with the sequence of shots.
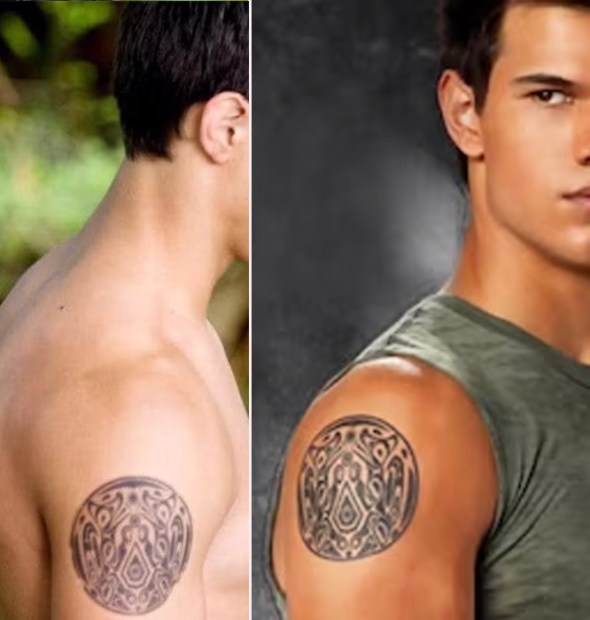
Of course, sometimes continuity can be missed, even in big time movies. There are plenty of errors that have been noticed by viewers across all types of films. But one of my favorite mistakes is in the movie Twilight: New Moon. Throughout the movie, Jacob’s arm tattoo consistently changes its placement. In one scene it’s closer to his shoulder, while another is farther down his bicep. Very noticeable, especially in the shots where we see his full upper body. This shows us that consistency was not thought of, and it disrupts the narrative and concept of time throughout the whole movie.
Create:
This week I created a how-to video that demonstrates continuity and multiple camera angles. For my subject, I picked how to properly light a candle. As an avid candle lover, I only recently learned the proper way to light a candle and how doing it wrong can be dangerous and wasteful. Most people just light a candle without thinking, so I wanted the video to show the proper way to light it while also explaining why its important.
I went about shooting this video in multiple takes. In the first take, I used my phone to shoot the close-up shot, where I’m measuring. In the second take, I shot one side angle with my phone on a tripod while simultaneously shooting a second angle with my iPad for a more forward-facing shot. As you can see in the editing I was able to go back and forth between these angles seamlessly. Then finally, I shot the other close-up shots that I knew I could only shoot once – the cutting and lighting of the candle wick.
This method allowed me to get multiples angles and still give continuity between all shots. I was able to match on action and then show close ups for each step. While the video was challenging at first and took some pre-planning, I think it flows very well for a how-to video. Enjoy the finished piece below.